Solar Monitor Core Module 


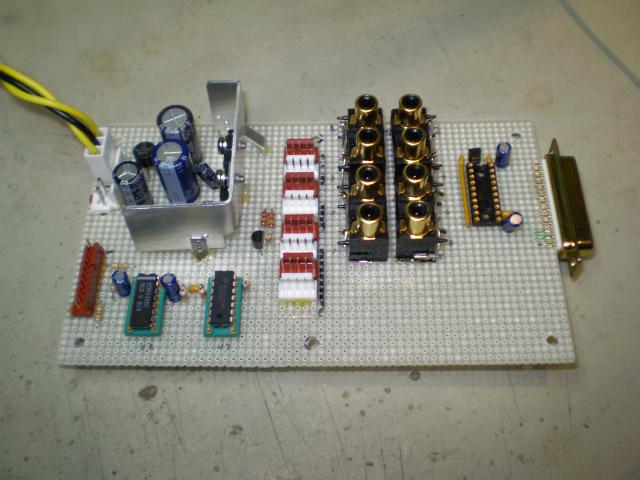
This is the core of the Solar Monitor project. There is a schematic here. This board holds the A/D converter which takes the signals from up to 8 bar graph/amp boards to be digitized and logged by Radio Sky. It also does the power distribution and some other house keeping functions.

In the upper left is the power input. An 18V Center tapped transformer from Jameco connects to the 3 pin molex. That gets turned into +- 10 or so volts DC, which is then regulated down to +- 8VDC by a 7805/7905 regulator pair. You can just about see them mounted to the heat sink - another part scavenged from a dead PC power supply.

Just below the transformer connector is another input from a 5V/3A switching supply from Jameco that supplies the logic and LED power.

The row of smaller molex connectors in the center is for the distribution of power to each of the bar graph boards (BGBs). Next to them are the 8 RCA jacks for the signals from the BGBs. Each BGB does a precision rectification, gain, and offset of the raw audio coming into it.

Finally on the far right is the socket for the MAX186 and the connector to the host computer.

In the lower left corner there is a 74HCT132 quad nand gate that handles the alarm function. Each BGB has an option to drive an open collector alarm bus when the top-most LED is lit. This gate latches that signal and generates a beep.

Next to the '132 is a 74HCT4538 dual one-shot. It's configured to time out if there's no activity on the A/D chip select for more than a second. It has a red/green LED attached so I can tell at a glance if the computer has stopped getting data from the A/D.

In the schematic, the LEDs, Speaker, etc are shown as being on the board for clarity. Next to each one is a tag showing which pin on the 10-pin molex connector it actually goes to.

This still needs some testing, and then it's time for the mechanical work to put the card cage together.

Cheers,
[ add comment ] ( 15 views ) [ 0 trackbacks ] permalink ( 3 / 1898 )
Cloud Computing 

I was thinking about "Cloud Computing" today as I was driving along with the roof down. When you have been a nerd as long as I have, you begin seeing long term patterns in technology. Cloud Computing is a phase in computing that we have experienced in the past.

The earliest computers I was aware of, in the 1960's, were the big iron behemoths that took up entire buildings and consumed more power than a small town. They were tended by staffs of professionals who created the programs, ran them on the data provided by the users, and then provided results in piles of printouts. I love the scene in Apollo 13 where Gene Krantz (Ed Harris) turns to one of the Mission Control staff and tells him to fire up another computer and bring it on line to deal with the data from the crisis. Computing was centralized in the control of a few.

By the time I got my hands on a computer, around 1973 or '74, it was a PDP-8E from Digital Equipment Corporation (DEC, bought by Compaq, bought by HP). Computers had been scaled down in size and price so that individuals could have access to them. Computing was localized in the hands of the users.

At Worcester Polytechnic Institute (WPI) I had experience with some in-between type systems. They had an IBM360 clone that ran programs from punched cards. I punched the cards, and held all the data, but they ran the programs for me. We also had a relatively large DEC System 10 with time sharing. There were terminals all over campus. The machine was multi-tasking many users. We were sharing one large machine.

In fact, WPI had the best computers in Worcester available to students, so there was a deal to allow students from the other schools to use it too. They called it the Worcester Area College Computation Center, or WACCC. Pronounced "whack". You can imagine the ensuing bad/colorful puns.

Fast forward to the Personal Computer "revolution" (forgetting machines like the PDP8 and LSI-11) and now we have a computer per person. Again. There were still large supercomputer installations, but generally the emphasis was on localized computing.

So now, all of those personal computers are interconnected by the internet. Google, among others, are proposing that we no longer run software on our own computers, but instead run a copy living on a server somewhere. We store our photos and music on a remote server. Computing got centralized again.

One of the large server farms will have some major failure, and we will realize that maybe we should have retained more local control. The best answer is some balance of the two, as always.

I skipped a couple of interesting little blips in there like the diskless computers that Sun made, intended to upload everything from a big host computer. We called them "pizza boxes" because that's exactly what they looked like. Minus the grease stains, usually.

Cheers,

Keith
[ 1 comment ] ( 42 views ) [ 0 trackbacks ] permalink ( 3 / 1923 )
Solar Tracking VHF Antenna Part 2 

Figuring out how to make the antenna track the sun was fun and interesting. I started out with a book called "Sundials: Their Theory and Construction" by Albert E. Waugh (ISBN: 0-486-22947-5). It takes you through the basics of how the sun appears to move through the sky. Remember that it's the Earth that's rotating... In the appendix of the book are several helpful tables of data. I ended up using some of that data in the PIC firmware.

The key to all of this is something called The Equation of Time (EOT), which describes how the position of the sun at noon varies throughout the year. From that equation, one can calculate the Solar Azimuth Angle and the Solar Elevation Angle.

The problem is that both require calculations of sin, cos, tan, and their inverse functions. I'm trying to do this in a relative small PIC processor. The only way to get there is to figure out how much precision I really need.

One Aside: I know I could run some planetarium software on my PC and just send standardized messages to the antenna driver to move it. That would be fine if I was willing to always have the application running on my desktop. I like to build stuff that requires less direct control by my PC. In this case, I want the antenna system to track the sun by itself, with higher level status and control to/from the PC.

Anyway, the half power beamwidth of the HD-6000 at 108 MHz is about 70 degrees, so that gives a fair amount of leeway in Azimuth. I don't have any data for the vertical beamwidth, but I decided that 5 degree steps in each direction should be fine. I worked from there and decided that I needed to move the antenna every 20 minutes to keep it reasonably well aimed at the sun.

To do all of this with integer math, I decided to scale the trig functions by 1000: 0-0.999 becomes a three digit integer from 0-999. To conserve memory, I have one table that converts integer angles from 0 to 90 degrees into the sin times 1000: sin(45) = 707. From this one table, I calculate the sin of any angle by inverting the angle and/or result. I use similar tricks to get the cos of any angle. The tricky bit is figuring out when you need to divide by 1000 to stay in scale.

Here's how it ends up working in the software.

Get the time from the RS-485 port. See my Precise Time and Frequency Page for details of where that comes from. Convert it from UTC to Local Mean Solar Time(LMST) which corrects for the difference between solar time and my exact longitude, and adjust it for today's equation of time. The EOT correction is done every morning at 2:30 AM.

Every 20 minutes, calculate a new position for the antenna:
Look up today's solar declination angle
Calculate the hour angle from the LMST
Calculate the Solar Elevation using the trig functions
Calculate the Solar Azimuth using the trig functions
If the sun is above the horizon, move both motors.

I have one place where I need to fudge to make up for the limitations of the integer math. When the hour angle is zero, right at noon LMST, the azimuth equation really needs more digits of precision to avoid bad results. I just check for the angle = zero and set the azimuth to zero. Much simpler than dealing with bigger variables throughout.

The code uses about half the available ROM and RAM. That leaves room for future improvements, but I'm really sure I couldn't have fit the floating point and trig routines from the C compiler.

It's working well, and most of the tweaks I've made have more to do with finding home and dealing with the limit sensors.

Drop me a line if you want to see the actual code.

Cheers,

Keith


[ add comment ] ( 11 views ) [ 0 trackbacks ] permalink ( 3 / 2016 )
Solar Tracking VHF Antenna Part 1 


This is my semi-homemade alt-az mount with broadband VHF antenna attached, ready to go on the roof. Well, almost ready... I still need to do some testing on the ground. It's a lot more convenient than climbing a ladder to fix something.

It all starts with a pretty generic tri-pod mount. On top of that is a cheap used ChannelMaster rotator I got from eBay. That gives me the azimuth rotation part of the alt-az mount. Above that is a short section of pipe/mast which holds the antenna. So far, pretty standard.


Here you can see a closeup of the part above the rotator. Instead of using the standard "U" bolt to attach the antenna boom to the mast, I located the balance point of the antenna and drilled a hole there. A combination of threaded rod and nylon bushings allows it to tilt up and down from below horizontal to about 80 degrees. I'm at 38.5 deg north, so that's enough to track the sun to its highest point in the summer. The altitude drive is a 200 step/rev stepper motor. The shaft is extended through the vertical mast to a toothed pulley. The matching belt wraps around an acrylic disc from Tap Plastics and is fixed to the disc at a point opposite the stepper pulley. The large pulley gives me higher resolution than 1.8 degrees per step I would get with a direct or 1:1 drive.

The antenna is a Winegard HD-6000 I got from Wholesale Electronics


I got a little bit lucky with the driver electronics. The ChannelMaster control box had a PIC16C57 processor in a socket. I reverse engineered it and then designed a board to plug in to the PIC socket. That's what you can see here in this inside view of the control box that mounts below the rotator. The original rotator control board (minus the LED display) is on the bottom, and my board is on top. I used a newer PIC16F87 and added a stepper driver for the altitude step motor. The heatsink (from an old PC Power supply) has the driver chip (salvaged from an old printer) and a 7805 5V regulator. I also added an RS-485 serial port so that I can tell the PIC the date and time as well as getting status back from it.

The small board with terminal block in the lower left of the picture is the power supply. The transformer is a Class 2 type mounted to the side of an electrical box in the attic so that no 110V needs to go outside.

The software that tracks the sun using only PIC level integer math is another story...

Cheers,

Keith

[ 2 comments ] ( 346 views ) [ 0 trackbacks ] permalink related link ( 3 / 521 )
Radio Astronomy - SARA Western Conference 

I'm really looking forward to the upcoming Western Regional Conference of the Society of Amateur Radio Astronomers coming up next month at Stanford. It's just too much of a trek for me to get from Sonoma County, CA to the big SARA meeting at Greenbank in the summer. I do hope to make that pilgramage one year. SARA had a meeting at Owens Valley Radio Observatory several years back, and it was great.

I'm sure I'll learn some things I can apply to my projects here, and I'll meet some interesting people too!

Cheers,

Keith
[ add comment ] ( 11 views ) [ 0 trackbacks ] permalink ( 3 / 503 )

<<First <Back | 1 | 2 | 3 | 4 | 5 | 6 | Next> Last>>