I usually hand solder SMT devices in the prototypes I make for clients. Some parts have a large pad on the bottom that needs to get soldered to a plane for heat dissipation or RF grounding. When I can, I put a large hole in the center of the pad so that I can solder it from the bottom after the other leads are soldered down. But, sometimes the part is too small for that.
I picked up a cheap toaster oven to do reflow soldering as described in many places on the web. It worked marginally well. There were two problems. 1) The highest temp setting was right at the solder melt temperature threshold, and 2) the temperature swings were awful since it is a simple bi-metallic strip thermostat.
A while back, I picked up a pair of Omega CN7000 temperature controllers at the Valley of the Moon Amateur Radio Club hamfest in Sonoma. One had a bad display, and the other was missing the output relay. I swapped parts and ended up with one good controller. Time to start hacking...
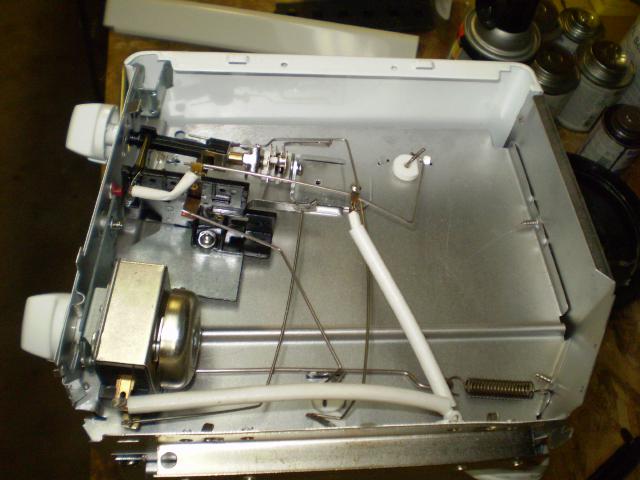
Here I have taken the end cover off the toaster. You can see the thermostat and control switches at the top left, and the timer with bell at the bottom. After figuring out how it was connected, I removed all of the controls in preparation for adding my own.
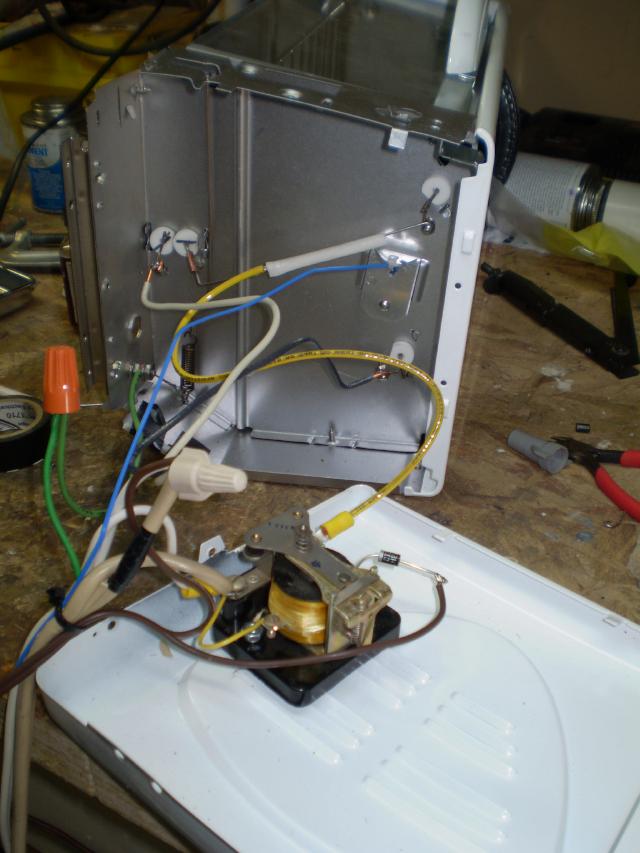
The toaster needs about 11 or 12 amps with all of the elements turned on, and the relay in the CN7000 is only rated at 9 amps. Luckily I had a 20 Amp rated relay with a 110VDC coil in my junk box. I mounted this to the inside of the end cover and started wiring it all together.
The toaster has two pairs of elements, one on top, and one on bottom. Each pair is connected in series at the far end, and the pairs are connected in parallel at this end. The center wires of the elements get really hot, so the original used welded connections. I left some of the original wire intact on each element, bent it into a small circle, and used SS screws to bolt the connections together.
The main power cord comes in and the hot side goes to one of the contacts on the relay. The neutral goes to the big wire nut, and the ground wire goes to the chassis of the toaster. One side of the series/parallel heaters goes to neutral, and the other to the other side of the relay. Two bits of zip cord go out to the CN7000. One provides power to it, and the other goes to the output contacts to switch power to the big relay coil.
The diode next to the relay coil converts the 110AC to 110DC. This picture doesn't show the 10uF, 200V capacitor also required. I know, running 110AC through a diode doesn't give you 110DC. But, it's close enough to operate the relay coil very nicely. In fact, I could use a smaller capacitor since short "off" times from the controller don't open the main relay.
I buttoned it all up and gave it a spin. My procedure is to set the controller for 150C and let the oven warm up while I prep the board. I put solder paste on the pads to be soldered (using a toothpick), and put the parts in place. The paste does a decent job of holding them while I move the board to the oven and put it on the rack.
Close the door and wait about 3 minutes to bring everything up to temperature. Then, I set the controller for about 210C and watch the temperature climb. When it gets to about 195 and the solder starts to melt, I wait 30 more seconds and then pull the plug. Wait another 30 seconds, and then open the door to let it cool. After a couple of minutes I pull it out of the oven completely and let it come down to room temperature. Voila! soldered SMT parts.
It's a little noisy as the relay clacks on and off, and I need to figure out a clean way to attach the controller to the oven, but for now it works great.
Cheers,
Keith
[ 3 comments ] ( 152 views ) [ 0 trackbacks ] permalink I picked up a cheap toaster oven to do reflow soldering as described in many places on the web. It worked marginally well. There were two problems. 1) The highest temp setting was right at the solder melt temperature threshold, and 2) the temperature swings were awful since it is a simple bi-metallic strip thermostat.
A while back, I picked up a pair of Omega CN7000 temperature controllers at the Valley of the Moon Amateur Radio Club hamfest in Sonoma. One had a bad display, and the other was missing the output relay. I swapped parts and ended up with one good controller. Time to start hacking...
Here I have taken the end cover off the toaster. You can see the thermostat and control switches at the top left, and the timer with bell at the bottom. After figuring out how it was connected, I removed all of the controls in preparation for adding my own.
The toaster needs about 11 or 12 amps with all of the elements turned on, and the relay in the CN7000 is only rated at 9 amps. Luckily I had a 20 Amp rated relay with a 110VDC coil in my junk box. I mounted this to the inside of the end cover and started wiring it all together.
The toaster has two pairs of elements, one on top, and one on bottom. Each pair is connected in series at the far end, and the pairs are connected in parallel at this end. The center wires of the elements get really hot, so the original used welded connections. I left some of the original wire intact on each element, bent it into a small circle, and used SS screws to bolt the connections together.
The main power cord comes in and the hot side goes to one of the contacts on the relay. The neutral goes to the big wire nut, and the ground wire goes to the chassis of the toaster. One side of the series/parallel heaters goes to neutral, and the other to the other side of the relay. Two bits of zip cord go out to the CN7000. One provides power to it, and the other goes to the output contacts to switch power to the big relay coil.
The diode next to the relay coil converts the 110AC to 110DC. This picture doesn't show the 10uF, 200V capacitor also required. I know, running 110AC through a diode doesn't give you 110DC. But, it's close enough to operate the relay coil very nicely. In fact, I could use a smaller capacitor since short "off" times from the controller don't open the main relay.
I buttoned it all up and gave it a spin. My procedure is to set the controller for 150C and let the oven warm up while I prep the board. I put solder paste on the pads to be soldered (using a toothpick), and put the parts in place. The paste does a decent job of holding them while I move the board to the oven and put it on the rack.
Close the door and wait about 3 minutes to bring everything up to temperature. Then, I set the controller for about 210C and watch the temperature climb. When it gets to about 195 and the solder starts to melt, I wait 30 more seconds and then pull the plug. Wait another 30 seconds, and then open the door to let it cool. After a couple of minutes I pull it out of the oven completely and let it come down to room temperature. Voila! soldered SMT parts.
It's a little noisy as the relay clacks on and off, and I need to figure out a clean way to attach the controller to the oven, but for now it works great.
Cheers,
Keith

 ( 2.5 / 1730 )
 Calendar


