Solar Tracking VHF Antenna Part 1 


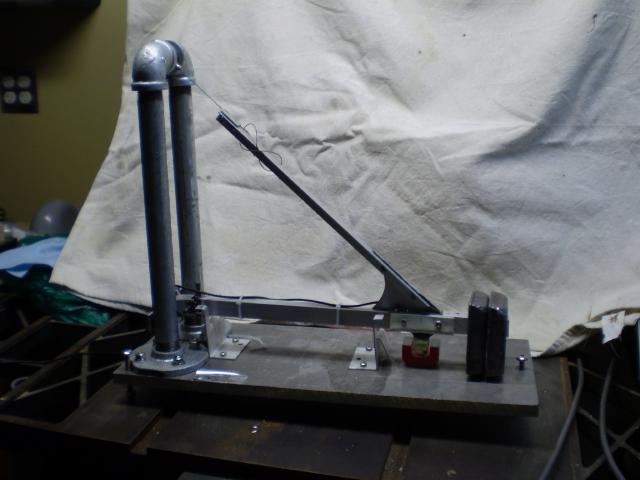
This is my semi-homemade alt-az mount with broadband VHF antenna attached, ready to go on the roof. Well, almost ready... I still need to do some testing on the ground. It's a lot more convenient than climbing a ladder to fix something.

It all starts with a pretty generic tri-pod mount. On top of that is a cheap used ChannelMaster rotator I got from eBay. That gives me the azimuth rotation part of the alt-az mount. Above that is a short section of pipe/mast which holds the antenna. So far, pretty standard.


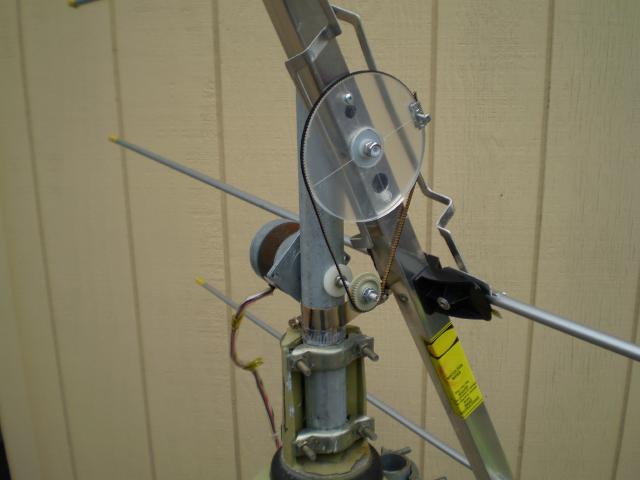
Here you can see a closeup of the part above the rotator. Instead of using the standard "U" bolt to attach the antenna boom to the mast, I located the balance point of the antenna and drilled a hole there. A combination of threaded rod and nylon bushings allows it to tilt up and down from below horizontal to about 80 degrees. I'm at 38.5 deg north, so that's enough to track the sun to its highest point in the summer. The altitude drive is a 200 step/rev stepper motor. The shaft is extended through the vertical mast to a toothed pulley. The matching belt wraps around an acrylic disc from Tap Plastics and is fixed to the disc at a point opposite the stepper pulley. The large pulley gives me higher resolution than 1.8 degrees per step I would get with a direct or 1:1 drive.

The antenna is a Winegard HD-6000 I got from Wholesale Electronics


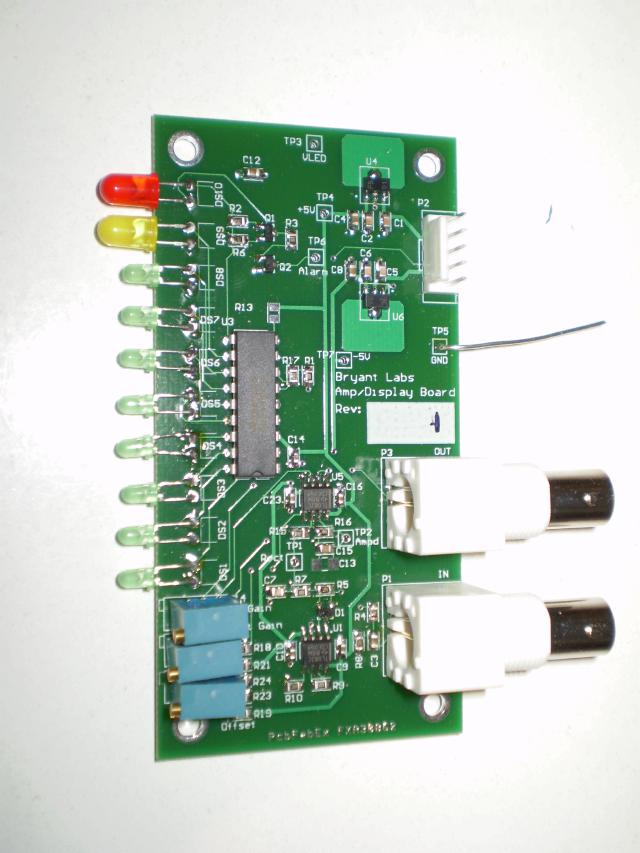
I got a little bit lucky with the driver electronics. The ChannelMaster control box had a PIC16C57 processor in a socket. I reverse engineered it and then designed a board to plug in to the PIC socket. That's what you can see here in this inside view of the control box that mounts below the rotator. The original rotator control board (minus the LED display) is on the bottom, and my board is on top. I used a newer PIC16F87 and added a stepper driver for the altitude step motor. The heatsink (from an old PC Power supply) has the driver chip (salvaged from an old printer) and a 7805 5V regulator. I also added an RS-485 serial port so that I can tell the PIC the date and time as well as getting status back from it.

The small board with terminal block in the lower left of the picture is the power supply. The transformer is a Class 2 type mounted to the side of an electrical box in the attic so that no 110V needs to go outside.

The software that tracks the sun using only PIC level integer math is another story...

Cheers,

Keith

[ 2 comments ] ( 347 views ) [ 0 trackbacks ] permalink related link ( 3 / 528 )
Radio Astronomy - SARA Western Conference 

I'm really looking forward to the upcoming Western Regional Conference of the Society of Amateur Radio Astronomers coming up next month at Stanford. It's just too much of a trek for me to get from Sonoma County, CA to the big SARA meeting at Greenbank in the summer. I do hope to make that pilgramage one year. SARA had a meeting at Owens Valley Radio Observatory several years back, and it was great.

I'm sure I'll learn some things I can apply to my projects here, and I'll meet some interesting people too!

Cheers,

Keith
[ add comment ] ( 11 views ) [ 0 trackbacks ] permalink ( 3 / 510 )
Radio Astronomy - Multi-Frequency Monitor Part 1 

Now that the seismometer has been delivered, I can get back to work on my Multi-Frequency Monitor project. The basic idea is to monitor radio activity in several parts of the the spectrum, from VLF up to Microwaves. I was inspired to do this because of the long, deep, solar minimum we just experienced. I want to see what happens as the sunspot numbers go up through this next solar cycle.

My plan is to have several antennas covering the bands of interest, backed up by receivers for each. The receiver outputs will be conditioned, displayed on bar graphs (I LOVE blinky lights!) and then digitized with a MAX187 A/D converter. Radio SkyPipe will handle the data acquisition and display.

First up will be 111MHz (modified aircraft receiver kit), 20MHz (RadioJove), and 24.8KHz (HP3586C SLM).

I designed and built the bar graph cards last year. Here's a photo of one of the prototypes:


I searched all over the net trying to find a kit or module that would do a bargraph. When I couldn't find one, I resorted to building my own.

These will be mounted vertically in a 3U (5.25") card cage, with the LEDs poking out through a panel for each board. This prototype has the wrong Red and Yellow LEDs: they will all be T1 size. In the lower right are the input and output jacks. Next to them are the gain/offset/filter amplifiers. The pots allow me to adjust offset and gain for both the display and the signal going to the A/D. In the middle is the LM391x bar graph driver. They have three variants with either linear, log, or VU scaling. The upper right has the power input and voltage regulators.

These work great. I had only a couple of minor problems with the protos, but otherwise they work great.

Next up, the A/D board.

Cheers,

Keith

[ add comment ] ( 14 views ) [ 0 trackbacks ] permalink ( 2.9 / 2198 )
Seismometer Build Pt. 2 

Well, here's the finished seismometer ready for delivery. It was picking up the heavy surf off the Sonoma County coast for the last week, and also recorded a 3.0 at The Geysers.
To get here, I changed the upper suspension to be mostly rigid. It's hard to tell in the photo, but the angled part is 1/2" x 1/16" aluminum angle. I only have a couple of inches of exposed wire. This really killed a rotational movement about the boom axis that was cluttering up the results.

You can also see the cast lead masses at the end of the boom. I did these with a simple wooden form, and melted the lead on my Weber barbecue over some charcoal briquettes. I ordered the lead, a ladle, and some casting putty from Rotometals. The putty was very nice to smooth out the inside corners of the mold. Rotometals has a bunch of great stuff for low-melting temperature metal casting work.

The electronics for this setup all came from Larry Cochrane at the Redwood City Public Seismic Network. I bought a sensing coil, amp/filter board, and 16 bit A/D board all in a nice box. They are working great.
[ add comment ] ( 11 views ) [ 0 trackbacks ] permalink ( 2.9 / 554 )
Happy Birthday Charles Darwin! 

In my book, Charles Darwin was one of the great original thinkers. I put him right up there with Galileo in his willingness to question conventional wisdom and make the leap from creation to evolution. He agonized over his theory, knowing that everyone, including his family, would have a very difficult time dealing with it. Check out the Make: blog link to learn more.

Cheers,

Keith
[ add comment ] ( 8 views ) [ 0 trackbacks ] permalink related link ( 3 / 1876 )

<<First <Back | 1 | 2 | 3 | 4 | 5 | 6 | Next> Last>>